I recently finished retouching an image and got a quite big response and people asking for how to’s. I decided to explain my thoughts on the retouching process so maybe some things will become more obvious why I made certain changes. And because there is so much to cover I decided to split this among 3 Parts. Starting out with High-End Retouch RAW Conversions explained. Part 2 is gonna deal with the decisions made with cropping and composition and Part 3 will be dealing with changing a lighting situation and light behavior.
For me, RAW Conversions are a very important part and take me a while because those create my base file in Photoshop I am working from. I always care about image quality so I try to squeeze as much data from the raw material as possible. I also try to get as much done as possible before sending data to Photoshop.
Now…I know some people already have tried to follow my retouching on this image. So, I will give you guys some links to get the file from and I will give some explanations along so it may be easier to recreate.
The first resource I recommend is the Free RAW files provided by us. It is a great resource for learning and you will get some nice raw files for free.
Base Conversion
On the left side is the image out of cam. No adjustments made except white balance. And on the right side, you can follow my processing.
So now what influenced my decisions on the adjustments? The photographer and I decided to take this to the darker side. Dramatic and moody. And my intention was to expand the dynamic range as much as possible and get more or smother value transitions all over the range.
You might see some shadow detail clipping but at this stage, I do not bother. The skin contrast was what I cared about because I was thinking about getting that data back from another raw. As well as the blown-out areas on the rings.
Recovering Highlight Details
We definitely had some highlights clipped and I also was not satisfied with the amount of detail in the brighter parts of her skin so it was necessary taking them down.
You can follow the snapshot for more detailed information on how I set the sliders.
And then back in Photoshop, I set this layer on top using a black mask and then painting with white to show where and how much I want this layer to be visible.
And so, I tend to build the best possible data to retouch from
Recovering Shadow Details
As seen before we’ve lost a bit shadow detail in our base RAW conversion. So now it is time to get some detail back.
All adjustments were made just for the darker areas like between the hand and jaw and for some hair detail. My intention was to darken the background and having her head, nose highlights the brightest parts of the image falling off to the edges so details in the shadows become important.
As you might see, I never had to go crazy on any adjustment slider because we’ve had a good capture with plenty of data to play with. Most data lies in the upper 20% of the histogram, so, it is better to overexpose an image. Although, we’ve decided to darken everything in post-production. But there is so much data helping us to increase contrast and still having smooth gradations. This is something I always have in my mind when shooting for myself. Always expose for your shadows.
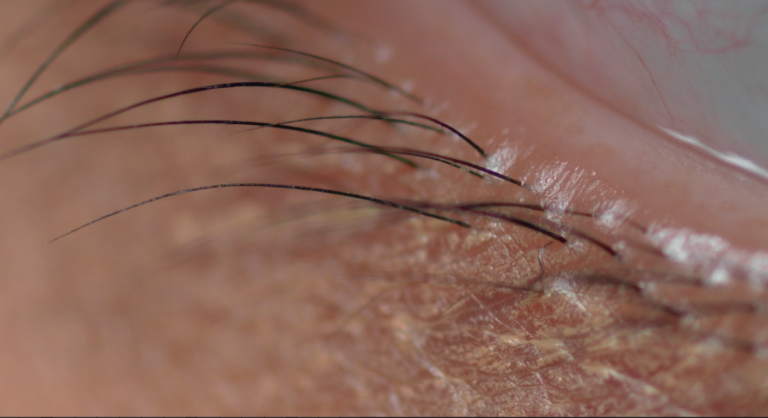
EYES!!!
As I said before, I try to get some things done before working in Photoshop. So why shouldn’t we brighten up the eyes using raw data?
Playing with the sliders in the details tab I found that they benefit from noise reduction. The brightening adds noise in the shadows, so this was a way to get rid of it and the structure in the eyes had become more painterly.
In general, this might cut detail, but the radius was just perfect for this and I decided to do some d&b and sharpening on the eye structure later in Photoshop to enhance this effect.
Reminder on Color Spaces
Here is a comparison with the same data displayed in sRGB. Because this usually is our output color space it is important to take in consideration that you might clip some data. In this case, the eyes are totally fine but always keep in mind that there are certain issues coming with using larger color spaces and if you are not familiar with color management then I suggest using sRGB would fit you best and will cause you fewer problems.
Comparison Out Of Cam vs Blended RAW Conversions
Hope there was some useful information for you guys and some try to recreate the image. =)
~Daniel
