Difficulty: Advanced
Read Time: 20 min

So, you are using visual aid layers for your retouching? Good, you seem to already have a fundamental knowledge and know about common high-end retouching techniques.
BUT, If you use the channel mixer adjustment layer as a visual aid for your dodging and burning, you might find this interesting as I explain why you should not be using it like you were told!
Welcome to a series I’m calling: “Breaking Bad Retouching Habits”. This series is to help clear up misconceptions about long-held beliefs around a handful of outworn retouching techniques that have been perpetuated over time without true merit or critical reasoning. Or techniques we find ourselves using with no true benefit when trying to master our craft.
Let’s start with something that was intended as a retouching aid. You might have heard or been told to use the channel mixer in the monochrome mode as a help layer. This adjustment layer is supposed to make flaws more visible and make it easier to spot what needs to be dodged or burned in order to create the beautiful clean skin.
It’s sad for me to say this but: You’ve been misled!
People like to say that there are no wrong techniques, but I hold to my opinion that often times when working in Photoshop, it doesn’t behave or do what we think it’s actually doing. In the process, you end up making a lot of extra work for yourself or even worse, introducing errors into your retouch.
High-End retouching is about consistency and precision. Every little mistake in our workflow adds up into a giant mess, and that’s not what any of us want.
There are two methods of using the channel mixer correctly. One other in particular is widely used, but will only serve to cause you more frustration than good. What’s crazy is, that you might not even be aware that it is a problem. My goal is to explain how it works and how you can use help layers in a precise and effective way to enable you to create better images and be more efficient in your retouching workflow.
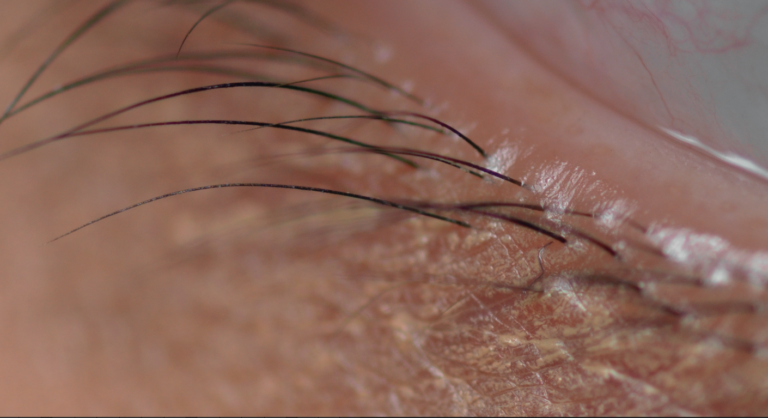
Help Layers like the channel mixer are typically used as a black and white conversion to make the process of dodging and burning easier. It simplifies the image by removing distracting color information, making it easier for your eyes to focus on luminosity values instead. It will also allow you to add contrast to the image so that you can spot flaws more easily.
Won’t it be fantastic to have a B&W conversion that represents the tones as we perceive them in the color image? This will make our dodge and burn workflow so much more accurate.
In case you are using the channel mixer adjustment layer as a help layer for dodging and burning, chances are, you were taught to set it to monochrome, increase the blue channel and then decrease the red channel.

As you increase contrast you are changing tonal relationships within the image. When dodging and burning, you end up correcting what you are seeing with the help layer active, yet you end up creating disharmonies and patches on the skin that weren’t there to begin with.
This lulls us into a false sense of security. Think about it for a moment, — as you’re adding contrast by taking the red slider down, the red colored skin tones in your image have become disproportionately darker than they actually are.

It is crucial to work with a true conversion of tones!
With dodging and burning we generally want to change luminosity values to create better gradations throughout the skin and to remove disruptive patterns that consist of different luminosity values. If you were making decisions about which values to brighten or darken when dodging and burning based on flawed feedback from your help layer, you can imagine the dire effects it will have on your work. That’s why it’s so important to have a true representation of the tonal relationships! It is essential for us to create clean work when using any help layer!
Well…, no. It can be used the right way. You just have to know how it works.
It is just this method of changing the tonal values that will cause you problems. It might also work when you are doing your healing and cloning in a separate layer as it helps to identify problematic skin areas. Just be aware that it favors red spots over more yellow skin tones when adding contrast.
I MUST stress:
DON’T USE THE CHANNEL MIXER with reds down and blues up as a visual aid for dodging and burning!!!
Let’s look at the options you have to get an accurate B/W representation that mimics the same transitions you see within your colored image. Here are a couple of ways you can correctly set up help layers when dodging and burning.
You can avoid all its flaws and faultiness by setting the adjustment layer’s blend mode to Color.
Alternatively, if you really want to get technical, you can think about each channel’s brightness contribution to the overall luminosity which will be: R30 G59 B11 (But I’d hate to bore you to death with the technical aspects of perceived luminance conversions, the wavelengths of light or the biological aspects of how our eyes perceive color and gradations)

R:30 G:59 B:11 or COLOR blending mode
There are many ways in Photoshop to achieve the exact same thing. As there are a couple options to set up a visual aid layer for dodging and burning.
Try using:
a black and white adjustment layer set to saturation blend mode
a neutral color layer set to color blend mode

Hopefully, I provided you with enough information to think about your workflow and what you are using for visual aids when retouching. If you have been using the channel mixer the wrong way, take a look at the 3 proven methods above. There is absolutely no reason to keep on using it the wrong way. Give it a chance and you will notice your results improving vs. using a flawed method.
And to anyone else out there teaching: the “red channel down, blue channel up” method as a help layer, for the love of the retouching god, PLEASE stop recommending it for high-end retouching work or dodging and burning technique in particular.